Thursday, December 23, 2010

Little Angels, and roses


Thanks for coming back to visit me. I have been very busy taking care of my two boys and creating these cute little ornanments. These are made using silk flowers for the bodies. I used Peacykeen Stamps, Snow Cuties to stamp on the face. The faces are wooden balls and you can stamp on wood if you used Staz On ink. The only issue I had was trying not to smear the ink. That was a little challenging as you can see some of the faces were a little smeared. The hair is yarn that I wraped on a knitting needle and put in the oven on low for ten minutes. You wait for the yarn to cool before taking off. My favorite part of these are the wings. I used the leaves of the flowers for the wings. I take elmers glue and put it on the wings and add fine glitter to it. Shake off the excess and you have a glittery wings. I find when making these that the full flowers work best.


Here is the other creative project I have been working on. I have been interested in creating my own flowers. I like Primas but I really wanted to be able to not have to always go out and buy them, also sometime they do not have the color I want. I have been busy watching some Youtube videos and used the materials I have and came up with these. I am happy with how they turned out. I used chalk, homemade glimmer mist, perfect pearls, paint, different types of cardstock, water, brads, stickles,  cricut cartidges, and of corse hot glue. Hot glue makes them stiff, so they last longer. My other love is Glimmer mist. I so love this stuff. I seem to be spraying everything with it. My local Micheals does not sell it, so I decided to made my own. If you want here is the recipe for it:

Glimmer Mist
small spray bottle with warm water
modpog
paint
pearl ex or perfect pearl

dip end of brush into mogpog and put into warm water then stir. I did this twice, then put a couple drops of paint of your choice and stir that too. Then add a small amount of pearl ex or perfect pearl. then swish it around. I used perfect pearl and that work out great. I just made white and it turned out perfect. Have fun


Thanks again for coming to my little corner and seeing my creativity at its best. I hope to be posting soon  a mini Album I did. See you guys soon and I hope you all have a safe and happy Hoiday.

Friday, December 10, 2010

Babies, Cat and Santa

Thanks for coming back to visit my little corner. I truly appreciate all the followers who want to come back and see what I have created. As most of you have seen I have been MIA for a while. Even though I have not posted anything does not mean I have not been creating. I have been in this kick of creating cards.....


Here are a couple cute cards I made for a couple of friends of mine for their baby showers. I used Everyday Paper doll  Cricut Cartridges for both the boy and girl card. The faces were from Peachykeen stamps the Snow Cuties collection, the ink is Memento. I used some chalk, and a black marker to highlight the babies clothing.

This cat card was for a bottle swap I did. That was so much fun and the goodies I got were fun. I used the Create a Critter Cartidge to make this card and used peachykeen stamps to make the cats face. I used some Distress ink to color the cat and some chalk to highlight the cats face.
This last card is used with the new Lites Cartidge Holly Jolly. I so love this cart. It has a lot of fun images. It is a great cart to add to your collection.


I hope to have some new stuff posted soon. I am working on other projects besides cards. I love this time of the year because I love to create fun and cute christmas decor. I am so glad you came by to see what I was up to in my little corner. See you soon.


Thursday, October 14, 2010

Think Pink- Week #2 Challenge for the Cricut Circle


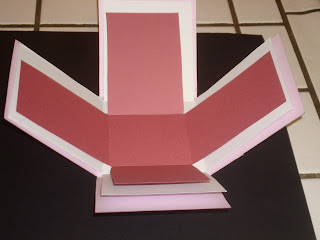
I decided to head to my little corner and create this cute gift/ home decor item. I created this for the Cricut Circle Challenge; Think Pink. For this challenge we are suppose to create a card, scrapbook page or home decor item, using three of any of these items : Pink, Ruffles, Scallops, Flourishes, Glitter, and Jewels. We are also suppose to use two cuts from the cricut. I decited to create an explosion box that can be used as a home decor album.

Recipe:
Home Accent
Home Decor
Seranade
Pink Bazzle paper
MS Scoreboard
Scallope punch from Fiskers
Black chalk ink
Pop Dots,
Atg gun


I am very happy how my project turned out. I hope I was able to give you some type of inspiration to help you create something. If you would like the directions on how to create an explosion box please PM and I will send you the information. Thanks so much for coming to My Little Corner. I hope you can visit me again.

Thursday, October 7, 2010

French Manor- Cricut Circle Challenge

This post is for the Cricut Circle weekly challenge. This challenge was to use the Cartidge French Manor and make a scrapbook page, home decor or a card. You are suppose to make two cuts and include gems, or pearls. I decided I wanted to make something other then a card like my other post. I wanted to make a scene because of all the beautiful cuts in this cartridge.  When looking in the Recollections paper stack Ravonhead Manor I found this page, and thought it would be perfect. I wanted to make a living room scene and the black chandelier sold me. This page could be used as a home decor or a scrapbook peice. So as followed I used:

French Manor cartidge
Cut the Couch, table and birdcage all @ 3 1/2 inches
Cut two couches out of different colors for layerd effect
Used black and crystal gems
Glued them on with Fabric Tac Adhesive
Paper Stack: Recollection Ravonhead Manor
Black and Yellow Stickles
Distressed with black Colorbox Chalk Ink

Thanks for stoping by and hope to see you in my little corner.......

Friday, October 1, 2010

Spooky card

Hello friends thank you for joining me again. I was so glad that I was able to get back in my corner and do some crafting.  For this crafting project I created a card. This card is for My Pink Stamper's Spooky Challenge. She wanted us to create a card, layout, or decor item that represented halloween or a  fall theme. I decided to go with a halloween theme...oh I do love this holiday. For this card I cut a black sheet of cardstock at 4x5. I cut the green spiderweb paper from Recollections at 3x4. I used stickles to outline the spiderweb, so it would make this paper sparkle and not be so dull. I needed to add a spider and I found the best one was in mini monsters cartridge. Such a cute spider. After using this cartidge I realize I really love this cartridge...it is so fun and lots of great images in it. I cut the shadow spider and used the gypsy to hide the face ( To do this you would click the hide contour botton on the gypsy pad). This gave me the freedom to make my own face. Instead of making my own face I used peachykeen stamps....Monsters faces...these clear stamps are so great. They are easy to use and clean. They have a varity of these stamps. I added some bling for the eye, tongue, and bow on her head. To give it some life I outlined the card and spider with a white jellyroll pen. This white pen look so good on the black cardstock. With Pinkcricut's halloween stamps I put EEK on the bottom of the card on some orange cardstock and finished it off with some silver ribbon. I had so much fun making this card....halloween is so fun and decorating for it is even better. Thanks again for joining me in my little corner.....Hope to see you soon.

Saturday, September 18, 2010

Happy Halloween

Hello to all of my friends, thanks again for joining me in my little corner. For today's post I decided to make a card for My Creative Times challenge, hosted by Emma. For this challenge we are suppose to use an old school cartridge of our choice. I decided to use Paper Pups. This cart is definitely an old school cartridge, but it has lots of great images in it. I wanted to create something for halloween. I love this little dog with the whiches hat flying on the broom. Nothing says halloween more then this image.  For the background of this card I used K&company Spook*tacular Cardstock. I used some orange and green cardstock too, along with some bat ribbon to tie this whole card together. I stamped Happy halloween and blended some orange distress ink on it along with inking around the edges with some chalk ink (black) . Finally I used my heatsetter tool to put a black crystal on for the eye of the dog. This was my first time using this tool and love it.  Oh, what a fun tool to have and it is fast and easy to use. Thanks for taking the time to look at my blog. I will talk to you next time in my lilttle corner.

Wednesday, September 15, 2010

Celebrate Birthdays


Yesturday was my niece's birthday and I toadally forgot.... lol. To make up for it I created a cute card for her. She is sassy and I thought her card needed some sass to it and I wanted to cheer her up. So with my Create a Critter cartridge I cut this cute little frog. I used my sandblock and distressed around the frog, his cheeks and around the lilly pad. I then used some chalk ink and inked around the pearl and yellow cardstock in the middle. I seem to ink around all of my projects. I just love that look. I used DCWV for the flower paper. I needed some blue ribbon but did not have any, so I inked the white ribbon I had blue. I got this great idea from the designer Tim Holtz. The saying, sorry, I froggot. is from My Pink Stamper's collections of stamps. To finish the project off I added some bling to it by adding the crystal butterfly and dragonfly. I am very happy with the way this card turned out. Thank you for coming back and to my little corner.

I created this card to celebrate my sister's Birthday. I wanted it to be simple. I cut the cake out of the Cartridge Lyrical Letters. If you are a cricut owner and do not have this cartrige, get it. There are so many cute designs in it. I then inked around all of the colored cardstock to give it my flare. I used some markers, embossing powder and some stickles to add to the cake. I stamped Happy Birthday. I love to make cards and nothing is more fun then giving them away. Thanks againg for following me and joining me in my little corner.

Tuesday, September 14, 2010

Sweet-Create a critter

I made this card for my husband who was so wonderful to bring me some cupcakes from Washington DC. I used the Create a Critter cartidge and cut out this cute little cupcake. I cut it at 4 inches and I then embossed the top with the swirl cuttlebug folder. I used some disress ink and inked up the raised part of the cupcake. Just a cute little note to say thank you.

Wednesday, September 1, 2010

Winter Frolic- Let it snow


This is my first blog entry. I became inspired by the challenge from MPS, so I decided to break out my Winter Frolic cartridge. I finished the card, however I was late to enter into the challenge. I am happy I did it because it helped me get my creative jucies going again. Thanks for visiting me and joining me in my little corner.